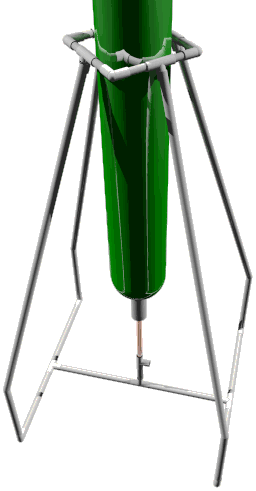
Design Considerations I needed a gantry that could support the booster for the 2 stage rocket so that I could use both hands to pump the air into the 8 litres of capacity above the water to around 95 psi. This is bad enough without holding the rocket but is impossible to do with only one hand. I needed to restrict the materials required to those that are available everywhere so I designed something that can use only elbow joints, T joints and tubing. It seemed obvious to attach it to the H Base which already provides a stabe base for the gantry so I started there. For each leg, an elbow joint takes a pvc tube up to the square at the top which provides the booster with good sideways stability. This design does not allow for fins on the booster but
they are not needed anyway as the recovery method is
'tumble'. This gives the advantage of extra stabili Parts To make one, you will need . . . A H-base which consists of . . .
The parts for the Gantry . . .
You will also need . . .
Construction Make the H-Base as described on that page. If you make the lengths of the pvc tubing the same as each other, the ends of the pieces on the ground will form a square. Put four of the elbow pieces on the ends of the H Base so that they are pointing upwards (see diagram above). Next, make the square. For this, you will need four elbow pieces and four T pieces. The pvc tubing usually comes in 3 metre lengths so cut off around 20cm of tubing of each of the two lengths. From these, make eight pieces 4.5cm long. Build the square as shown in the diagram above with alternate Elbow, tube, T piece, tube and so on. The square should fit over the 3 litre bottles that you are using for the booster. Twist the open ends of the T pieces so that they point outwards by about 30 degrees. Cut the remaining tubing into lengths around 1.1m long. Using a cork or a piece of damp rag, block up one end of one of the long lengths. Turn on a cold tap to slightly more than a dribble and leave it or, have a bucket full of water (needs to be at least 40cm deep - go for the tap). Switch on a medium sized gas ring on your cooker (or light a burner, use a bar-b-que and so on) and, whilst turning the pvc tubing continually, heat up evenly a length or the tube, roughly 20cm long, roughly 20cm from the end that you have blocked. Once the tubing has started to go limp over this length, blow down the open end so that it is slightly pressurised and bend the tube gently so that it has an angle of around 30 degrees - try to get a gentle curve so that it doesn't crumple. Then put the tubing under the tap so that it stiffens. Put the end closest to the curve into the elbow on the floor and the square on the other end, making one leg of the gantry. See how far out you are with the angle on the bend and adjust it accordingly (heat up the curve and straighten it slightly or bend it more slightly). Once it is correct, (you can be a couple of inches our and it won't make any difference) you have your pattern. Make the other three curved pieces by heating them up in the same way and then curving them so that the angles match that on the pattern. Do this by holding the two pieces side by side and banding them in the same way whilst pressurising the hot one so that it doesn't collapse. Once they are the same, drag the hot one under the tap whilst still pressurised.
2 Stage Rocket . . .
12 Litre Rocket . . .
|
|||||
|
 ty without having to worry about
fins. For the 12 litre rocket, the 4 elbow joints at the
top can be removed so that the T joints hold the rocket
in place. The flexibility and strength of the fins on the
12 litres will push the gantry out of the way at launch.