Hose Connector
Launcher
Having
built a Copper Tube Launcher, I decided to have a
go at a simpler design using hose connector parts
that are available from local hardware stores in
the UK (I suspect that these are fairly
standard on a global scale though).
Design
Considerations
By no means an exhaustive list - it should be . .
.
- Easy to attach to any standard PET bottle
rocket;
- made from materials that are available or
have equivalents worldwide;
- easy to make;
- easy to use; and,
- as safe as is reasonably pricaticable.
Parts
 These
items are for the launcher itself. I found them in
local hardware stores and supermarkets. In the
supermarkets, these items are seasonal so, if you
look at the wrong time of the year you may not find
them. Best time is spring or summer. These
items are for the launcher itself. I found them in
local hardware stores and supermarkets. In the
supermarkets, these items are seasonal so, if you
look at the wrong time of the year you may not find
them. Best time is spring or summer.
You decide what you want to attach it to - I used
my H-Base
which the base of this launcher is designed to fit.
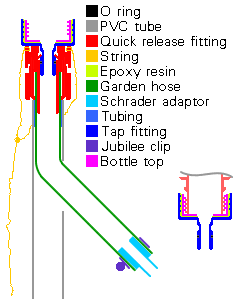
The parts you will need are as follows:
- Threaded Tap Connector (the Tap
Fitting in the diagram - 33.3mm,
G1", 1"BSP - this is big
enough to fit over a bottle top);
- Water Stop Hose Connector (Quick
Release Fitting in the diagram);
- 8" of Garden Hose (high
pressure type - fibre reinforced
preferable);
- 1" of tubing that will fit
between the inside wall of the pvc
tubing and the outside of the garden
hose - a tight fit;
- Pop Bottle Top;
- Epoxy Resin (Two part - 10 minute);
- Nylon or Polyester cord (approximately
2 feet - 60cm);
- Either:
- Short length (1 -
2") Copper Pipe;
 Woods/Schrader
adapter; Woods/Schrader
adapter;- 14 SWG Copper Wire;
- Solder and Flux;
|
| or |
- Car or Bicycle
Schrader stem (visit your
local garage or car
recycling depot)
|
- ½" - ¾" (13mm - 20mm)
Jubilee Clip (also called variously
worm or gear-drive hose clamp or
screw clip or screw clamp in various
parts of the world);
- 6" length of 21.5 mm od PVC
pipe; and,
- piece of string (about 20 yards
or whatever you feel safe with).
|
|
Construction
 Launcher Launcher
Cut a length of garden hose approximately 8"
long making sure that both ends are flat. Cut the pvc
pipe so that its ands are flat and square. Make a
hole in the side of the pvc pipe, approximately
2½" from one end and widen this out into an
ellipse so that the garden hose can be inserted into
the pvc pipe and pushed to the nearer end without
causing any creases in the hose.
Push the hose through so that approximately
1" protrudes from the end. Fix the Stop Hose
Connector to the end of the pipe and tighten (but
do not over tighten - remember that these are only
made from plastic). When it is tight, put the
1" length of pipe (with a slit up the side)
onto the hose so that it is next to the connector and
carefully push the hose back, feeding the hose back
through the hole in the side of the pvc pipe, so that
the hose connector fits snuggly on the end of the pvc
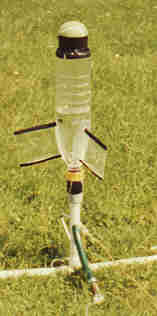
pipe as in the diagram above.
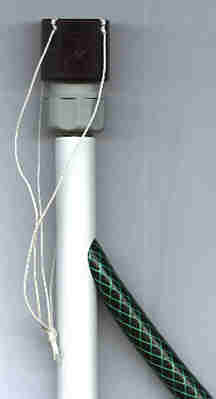
Using the soldering iron, carefully make three or
four, equally spaced holes in the top of the sliding
section of the hose connector. These should be large
enough to take the nylon or polyester cord (shown
in the picture on the right) and far enough from
the end of the sliding section to remain strong. Tie
three or four pieces of cord to the sliding section
and fasten them together at the bottom firming a loop
through which you can tie the release string later.
The other end of the hose has an adaptor that
allow you to pressurise the rocket. I use a car tyre
(Schrader) fitting. You can either get a
fitting from a car/bicycle shop or a tyre fitters or
a scrap yard or you can make your own from a piece of
copper pipe a woods/schrader adaptor and a piece of
thick copper wire.
To make your own, cut a length of thick copper
tube and cut a piece of copper wire long enough to go
around the outside of the woods/schrader adaptor and
bend it around, making a tight fit. File the side and
the inside of the copper wire ring to give a flat,
shiney surface suitable for soldering. Heat up the
pieces and apply the solder until you have a seal.
Let them cool down slowly until the solder solidifies
before you put water on to finish the cooling
process.
Put the adaptor (home made or bought)
into the end of the hose and use a jubilee clip to
secure it making sure that it is tight. Your launcher
should now look similar to the one in the picture on
the right.
Nozzle
 Select a bottle top
that has a flat end and cut a hole in it that is
slightly larger than the curved part of the nozzle
inlet (picture on the right). Using the
soldering iron, cut grooves around the outside of the
bottle top and along it making a cross pattern. The
grooves need only be around 0.5mm deep (remember
that using a soldering iron will make the sides of
the grooves stand out as there is no material loss).
Also, cut grooves in the thread of the threaded tap
connector, running across the thread thus making gaps
in the thread. Doing both of these will reduce the
chance of the top coming away from the tap connector
when screwing to/unscrewing from the rocket. Select a bottle top
that has a flat end and cut a hole in it that is
slightly larger than the curved part of the nozzle
inlet (picture on the right). Using the
soldering iron, cut grooves around the outside of the
bottle top and along it making a cross pattern. The
grooves need only be around 0.5mm deep (remember
that using a soldering iron will make the sides of
the grooves stand out as there is no material loss).
Also, cut grooves in the thread of the threaded tap
connector, running across the thread thus making gaps
in the thread. Doing both of these will reduce the
chance of the top coming away from the tap connector
when screwing to/unscrewing from the rocket.
Mix up some epoxy resin and apply to the inside of
the connector and the outside of the bottle top. Push
the two together and make sure that the bottle top
stays pushed up against the flat, internal face of
the connector. Allow to dry, holding all of the time.
If you tape it, the tape may move - if you clamp it,
the plastic may distort. It's only ten minutes and it
is vital that it is aligned properly.
 Once it has dried (leave it for
24 hours), it is time to pressure test the
system. Fill a 250ml bottle to the top with water and
screw on the nozzle that you have made. Fix it onto
the launcher and attach the air line. Take it up to
working pressure plus a bit (I have got well over
100 psi) and leave it for a short while. There
should be no leaks. The reason for filling with water
is that water is effectively incompressible (compared
to the system under test) and therefore does not
hold any appreciable energy should there be a
failure. Even so, you should have the launcher at at
least 5 metres distance. Once it has dried (leave it for
24 hours), it is time to pressure test the
system. Fill a 250ml bottle to the top with water and
screw on the nozzle that you have made. Fix it onto
the launcher and attach the air line. Take it up to
working pressure plus a bit (I have got well over
100 psi) and leave it for a short while. There
should be no leaks. The reason for filling with water
is that water is effectively incompressible (compared
to the system under test) and therefore does not
hold any appreciable energy should there be a
failure. Even so, you should have the launcher at at
least 5 metres distance.
 If everything has
held, you are now ready to go. If everything has
held, you are now ready to go.
Use
This assumes that you have pressure tested
everything.
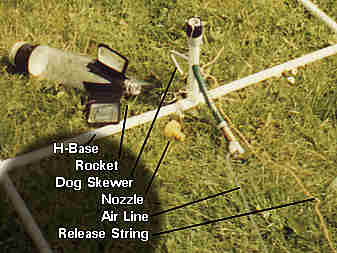
- Put the launcher in place and lay out the
string, tying the end to the loop in the
cords and putting the string through the dog
skewer. (It may pay you to add an extra
yard at the rocket end so as to warn you that
your kids are going to launch it while you
are still pressurising it - giving you enough
time to put your foot on it or run. Another
alternative is to have a hook and eye about a
yard from the launcher - only linking the two
when you are ready thus precluding your
offspring's attempts at entertainment)
passing it through a loop (the dog skewer
in this case so that pulling it from a
distance only pulls it downwards) making
sure that it will be able to move freely.
 |
- Connect the pressure hose and and
pump. Put the correct amount of water
in the rocket and screw on the
nozzle.
- Press the nozzle into place on the
top of the launcher.
- Pump air into the bottle until it is
at the right pressure Remember
- do not touch the rocket when it is
pressurised.
- Walk away to the end of the release
string.
- Ensure that everyone who is close
enough to need to know what is going
to happen next actually knows that
you are about to launch and then pull
gently on the release string.
|
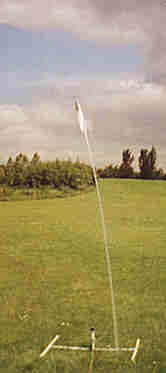 Note. This rocket
launches straight with the copper tube launcher (full
bore) but with the adaptor giving an 8mm nozzle,
possibly releasing unevenly with the catches inside,
sometimes goes off to one side (NASA launch style)
and sometimes straight. This also happens with other
rockets. The quick connector that I use here has two
sliding pieces inside whereas others that I have seen
have three. Remember that these fittings are meant
for garden hoses and not for launching water rockets. Note. This rocket
launches straight with the copper tube launcher (full
bore) but with the adaptor giving an 8mm nozzle,
possibly releasing unevenly with the catches inside,
sometimes goes off to one side (NASA launch style)
and sometimes straight. This also happens with other
rockets. The quick connector that I use here has two
sliding pieces inside whereas others that I have seen
have three. Remember that these fittings are meant
for garden hoses and not for launching water rockets.
If there is a slight mis-alignment of the nozzle
(the rocket's pressure vessel is not moulded
consistently, the nozzle is not located properly and
so on), the launch will go to one side.
Also, bear in mind (regarding safety of
spectators) that the angle of these is not
entirely predictable.
Remember that you may have a hose fitting with a
one-way valve in it that is opened by the inserting of
the tap connector. In this case, your launcher may still
be pressurised after launch. Look out for this and if
yours is like this (mine is) then depressurise
the system carefully at the end of the launch session.
One other thing to remember is that the time
investment that you make for the rocket is higher with
this launcher than the copper tube launcher - this one
takes a while to make a nozzle whereas the copper tube
launcher only takes two rubber rings so think about where
it is going to land.
 Back to the Launcher Index Back to the Launcher Index
Back to the Water Rocket Index
|