Having had a go at joining two bottles together to make a four litre combined bottle, I decided to extend this to joining three bottles together using the most effective fins so far and a parachute. Construction
This rocket differs in that bottles are mounted top to top and bottom to bottom. The skirts between the pairs of bottles support the upper bottles (which only have air in them and therefore do not weight very much and is supported adequately even under the high acelleration of the thrust phase). The top pressurised bottles are joined top to top which means that a simple connector made from two bottle tops, two washers and a brass fitting can be made using silicone sealant to provide the necessary seal. Each of the two tops have a hole cut in them and then sealant is spread on the connector threads. Taking one end at a time, a washer is placed on the thread together with more sealant, then the bottle top, more sealant and then the nut (which has its thread filled with sealant). The process is repeated for the other end of the connector, the hole down the middle cleaned and then the unit is left in a warm place to cure (several days). The bottom to bottom joins are made in the same way as the top to bottom joins in the 2 x 2 ltre rocket. The hole is made in the bottom of the lower bottle with a soldering iron (I used my 15 Watt Antex Model C soldering iron with a 3mm bit), carefully cutting around until the fitting fits. Being made of brass, it tends to set the plastic and if you have put it in the hole with a little less than adequate clearance, you may find that you have to unscrew it to get it out. It is possible to cut the hole with a drill although I would not recommend this because the use of a drill may cause small fractures to appear in the bottle bottom and also, the hole left by the drill has rough sides. When you have finished, go around the hole with the soldering iron (do this anyway if you have drilled it out as smoothing it out will reduce the possibility of surface cracks), smoothing as you go. Let it cool down. Next, fill the thread of the connector with sealant and add a washer, more sealant and then an o-ring. Put the connector in position and thread on the nut (again with its thread filled with sealant) from the inside. Make sure that the nut is tight. Mark out a skirt to fit the gap, slide the skirt over one of the bottles and repeat the process. Once both ends of the connector are tight, put in a warm dry place to dry out. Once the sealant has dried out, you can slide the skirt in place and screw on the top to top adaptor together with another skirt (note that this one will be a different length) and the top bottle. Having made sure that that adaptor is tight (be careful not to apply any torque that will sheer the sealant), put the upper skirt in place. Make sure that the rocket sections are straight and tape them. Add a parachute nose cone and some ready made fins (the same as described in the Challenge Rocket) and the rocket is ready. Water Pressurising to between 4 and 6 BarG (between 60 and 90 psig) the amount of water required is approximately 1.8 litres so if you fill the lower bottle, this will do (by the time some of it has spilled when mounting it on the launcher). I flew the rocket at 80 psi with around 2 litres of water using a circular nylon chute. It seemed to stay in the air for ever and flew 270 feet down-range.
|
|||||
|
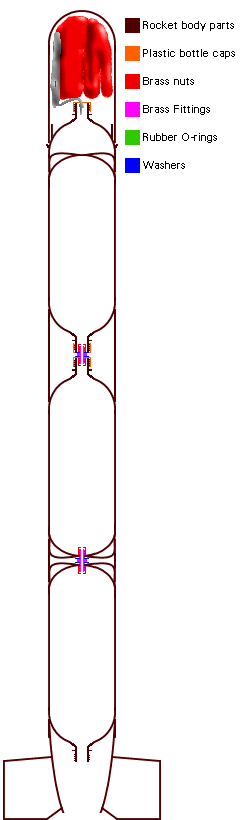
 As
with the 2 x 2 litre rocket, the main idea with
this rocket is the coupling between the bottles.
As before, it is made from a 8mm straight central
heating screw connector and, with various rubber
rings and sealant, forms a sealed joint between
the two bottles with the washers adding strength
where required.
As
with the 2 x 2 litre rocket, the main idea with
this rocket is the coupling between the bottles.
As before, it is made from a 8mm straight central
heating screw connector and, with various rubber
rings and sealant, forms a sealed joint between
the two bottles with the washers adding strength
where required.